
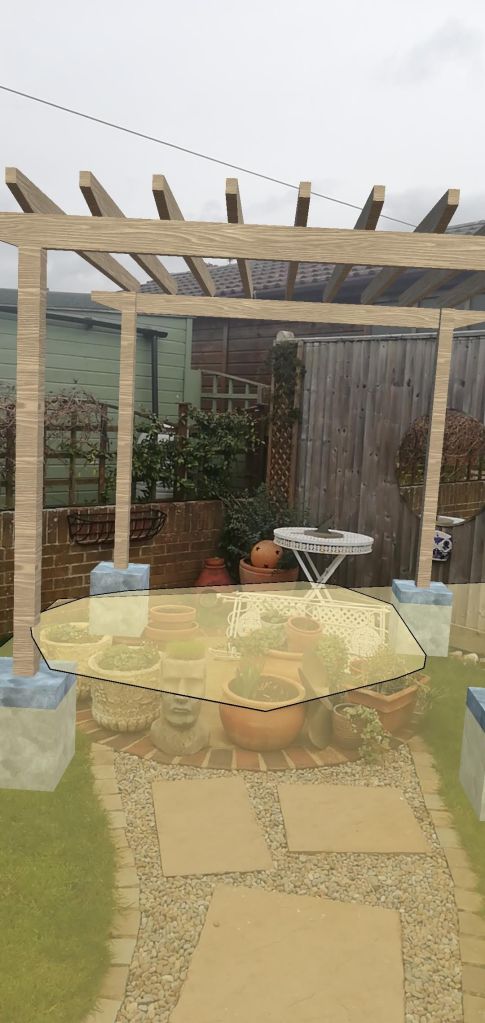
How’s the pergola going you ask? Great thanks! My parents have bought the materials for its due for delivery next week. I even managed to show them the AR model I made in the previous blog post when I went up to their house for a socially distanced garden cuppa. Except the app didn’t do the job it intended to do; I wasn’t able to rotate the pergola into position, and it was hard to show them the WHOLE thing where it took up most of the screen – it would have been good to scale it up and down where needed.
So I went back to the drawing board this week, at first it was simple, add two sliders on the overlay which I can slide up and down to rotate and scale. But how often do we do that on our phones… If I asked you to “zoom in on that photo” would you try and find the magnifying glass in the options, or would you ‘pinch zoom’ with your fingers? I’m guessing it would be the latter, at least that is what we’re accustomed to. It turned out the solution I needed wasn’t in the UI, it was in the UX.
The difference between UX and UI
I’m not a UX/UI designer, but you have to know the basics to cheat your way through a good experience in VR/AR application design. The topic is broad and fascinating and is a whole form of design in itself. My understanding of this is case and point with the example in the previous paragraph, you can do a UI for pretty much any action you’d like to perform, but that doesn’t mean it is providing a good user experience. Another example would be the classic AR app Pokémon’ go. What would be more fun when throwing your pokeball? Pressing a button that says THROW, or sliding your finger up across the screen just the right amount so the ball trajectory is perfect. Again, probably the latter.
UX also talks about how we move through the application. This is particularly common in VR where good level design is important to help a person navigate through a scene effectively without causing confusion. Thankfully, you architects and technologists out there are trained in level design whether you realise it or not! Think of floor plans… if I put the dining room upstairs when the kitchen is downstairs, you’d laugh at me. If the only way to access a bedroom was to walk through another bedroom, you’d tell me I was stupid. That is because you understand how a person is moving through a space, level design is exactly the same and it’s very tangible for archtiects and technologists to grasp. But I digress…
What UX are we creating?
Back to the pergola, we want to create a functionality to rotate and scale. Scaling seems pretty obvious, we’re all accustomed to a pinch zoom. However, rotate is very much up for grabs. First thing’s first, using one finger is off the table. Why? Because it confuses things in the code. I’ll give an example, say we use one finger to move the AR model around the scene. If we tap on the object and start moving our finger right, is this moving it right or is it rotating it about its point anticlockwise? And how would you differentiate that within the code? Rather than create complicated code, lets just add a finger in, one finger to move/select, two fingers to rotate. So what options have we got?
We can either use two fingers to swipe left/right or use two fingers to circle around a point. At first both seem just as easy, but let’s dive a little deeper. If you’ve got a phone or something vaguely phone shaped near you, pick it up. Hold it vertical and horizontal and try the motions below. Firstly with one hand holding it and the other hand using fingers and thumbs and then with two hands holding it using only your thumbs.
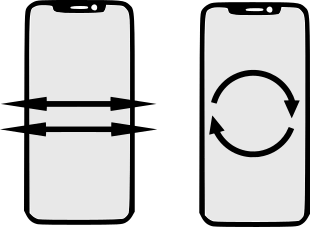

Which was easier to perform? Hopefully you’d have noticed that swiping from left to right with both hands on the phone, especially horizontally was a challenge (unless you have abnormally large thumbs). Still not convinced? Try combining the motions above with a pinch zoom, you’ll find that spreading your index and middle fingers apart can be quite a challenge. Taking the time to test these motions before you write the code for them is a great way to work on your apps effectively. If you find it uncomfortable, so will your user!
The math
I’m not a big fan of math but it’s another great way to design lean; make what you’re doing work mathematically. It’s why game companies put ‘good at math’ in their job listings, it saves them and you a whole load of time if you’re good at it. Thankfully, this math will be 2D, so not rocket science.
Scale
Firstly, the pinch zoom. When we are pinching, we are putting our fingers at a point and moving them away from each other. As our fingers get further apart, so does the distance between them (duh..), that distance is going to be different from the first time we put our fingers on the screen. So that is what we want to calculate, the difference in distance between our start and ‘current’ finger positions.
To calculate the distance, we need to take the X and Y of finger 1 and the X and Y of finger 2. Then measure the distance between them. This can be achieved using this formula:
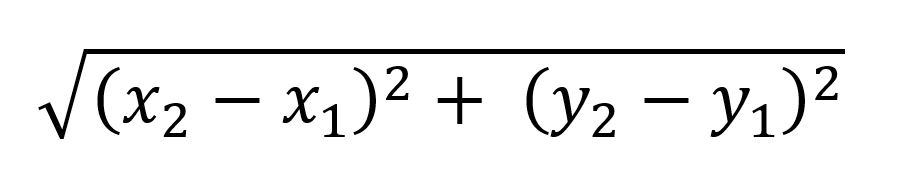
So when we drop our fingers onto the screen, we’ll run this calculation once and store the first values. Then as the fingers move, we’ll keep running this equation and compare the values, scaling the object by the difference between them (i.e. negative distance = smaller, positive distance = bigger).
Rotation
Now for the rotation. For this we will be using the circular motion as opposed to the two-finger slide, but how is this achieved? This isn’t going to be far off what we have used with the scale, we’re going to take the start and end position of two fingers except we aren’t calculating the change in distance, we’re calculating the change in angle. If you google “calculate angle between two points”, you may stumble across the function “two argument arctangent” or ATAN2. Without going into the complexities of it, this function swallows our problem whole and spits out an angle (in radians) from which we can compare our start and end points against. Our equation is going to look something a little like this:

Time to code!
Lets get this into two separate scripts one for scale and one for rotation. First lets look at scale.
using System.Collections;
using System.Collections.Generic;
using UnityEngine;

public class Scale : MonoBehaviour
{
    private GameObject mainObject;
    private float adjustmentValue = -0.001f;

    void Update()
    {
        if (Input.touchCount >= 2)
        {
            // Store both touches
            Touch touch0 = Input.GetTouch(0);
            Touch touch1 = Input.GetTouch(1);

            // Find the position in the previous frame of each touch.
            Vector2 touch0PrevPos = touch0.position - touch0.deltaPosition;
            Vector2 touch1PrevPos = touch1.position - touch1.deltaPosition;

            // Find the magnitude of the vector (the distance) between the touches in each frame.
            float prevTouchDeltaMag = (touch0PrevPos - touch1PrevPos).magnitude;
            float touchDeltaMag = (touch0.position - touch1.position).magnitude;

            // Find the difference in the distances between each frame.
            float deltaMagnitudeDiff = (prevTouchDeltaMag - touchDeltaMag) * adjustmentValue;

            // Find the main object and scale it by the difference in touch distance
            mainObject = GameObject.FindGameObjectWithTag("Main Object");
            Vector3 scaleChange = new Vector3(deltaMagnitudeDiff, deltaMagnitudeDiff, deltaMagnitudeDiff);
            mainObject.transform.localScale += scaleChange;
        }
    }
}
For this script, we are getting the input of our first touches and then adding the change in distance per frame to the scale of the object. The ‘adjustment value’ is there to adjust the scale speed, without it scaling up and down will be very quick! So where’s our formula you ask? This is absorbed into the “.magnitude” element of the script, this essentially flattens a Vector2 into a float value by taking the average value, similar to the principles outlined in our formula.
Now the Rotate…
using System.Collections;
using System.Collections.Generic;
using UnityEngine;

public class Rotate : MonoBehaviour
{
    private GameObject mainObject;
    private float adjustmentValue = -0.01f;

    void Update()
    {
        if (Input.touchCount >= 2)
        {
            // Store both touches
            Touch touch0 = Input.GetTouch(0);
            Touch touch1 = Input.GetTouch(1);

            // Find the position in the previous frame of each touch.
            Vector2 touch0PrevPos = touch0.position - touch0.deltaPosition;
            Vector2 touch1PrevPos = touch1.position - touch1.deltaPosition;

            // Calculate the angles between start end touch positions
            float startAngle = Mathf.Atan2((touch0.position.x - touch1.position.x), (touch0.position.y - touch1.position.y)) * Mathf.Rad2Deg;
            float currentAngle = Mathf.Atan2((touch0PrevPos.x - touch1PrevPos.x), (touch0PrevPos.y - touch1PrevPos.y)) * Mathf.Rad2Deg;

            // Calculate the difference between the two angles
            float angleDifference = currentAngle - startAngle;

            // Find the main object and rotate it by the difference in touch angle
            mainObject = GameObject.FindGameObjectWithTag("Main Object");
            Quaternion rotationChange = new Quaternion(0.0f, angleDifference * adjustmentValue, 0.0f,1);
            mainObject.transform.rotation *= rotationChange;
        }
    }
}
For this script, you’ll notice we are using some aspects from the other script (to the point where this could be combined into one script). You may have spotted our formula a few lines down:
            float startAngle = Mathf.Atan2((touch0.position.x - touch1.position.x), (touch0.position.y - touch1.position.y)) * Mathf.Rad2Deg;
            float currentAngle = Mathf.Atan2((touch0PrevPos.x - touch1PrevPos.x), (touch0PrevPos.y - touch1PrevPos.y)) * Mathf.Rad2Deg;
The only other difference on this script is how we apply the rotation change. Unlike scale, we can’t ‘add’ the changes per frame to a rotation because it is a Quaternion. Quaternions work slightly differently, but essentially all we need to know is that if we want to ‘add’ the difference in our finger positions, we need to multiply the game object we want to change with our new value, that is what the operator “*=” is doing.
Finally, a note on both of these, I have provided a solution for finding the game object we want to apply this to (GameObject.FindGameObjectWithTag(“Main Object”)). There are different and potentially simpler solutions here, and each one will be different for each AR application. However, from experience, I’ve found that a lot of the time we are ‘spawning’ an object into a scene. Having the ability to ‘look’ for the game object means we don’t have to go round our editor referencing our prefabs and serializing things, at the end of the day it’s up to you!
Conclusion
Feel free to copy these scripts into your scene, all you’ll need to do is tag the object you’re augmenting with “Main Object” and when spawned you should see something like this:
So there you have it, two levels of interaction without adding any form of UI at all. The principle of not adding a UI to get things done isn’t just applicable to AR, its also very much present in VR and our everyday devices. I’d suggest having a look at other types of interaction, how about a one finger move object interaction or a double tap option? Another example of a way you can increase your interaction without adding a UI.
It’s important to note that UI isn’t completely useless, what if you wanted to know how much you have scaled it up by? Or what angle you’ve rotated it to? What we don’t want is clutter, like I said, its an art in itself!

One thought on “Level Up Your AR UX Design”