
During the Christmas break my dad mentioned to me that he was thinking about getting a pergola for his garden in time for the summer. Now that everyone is bound to their homes at the moment, I said it was a good idea, he also offered (suggested) that I do the design for it since I’m designing in my day-to-day work. I thought sure, why not, got nothing better to do anyway since I’m inside all the time. He then mentioned that my mum was quite against the idea and needed convincing with a bit of photoshop or something. Then it hit me, why don’t I bring the pergola to her!
Introducing the PergolAR! An augmented reality pergola that requires no construction!
Anyway… pergola and poor sales tactics aside, this is also a common problem with the construction industry – convincing people of your designs. Augmented reality is great at doing this and in this blog post I’m going to show you how you can start to make your own AR application for your designs, whether its as small as a doorknob or as big as a house. Except for this example we are going to use as ‘medium sized as a pergola’…
Project Set Up
To get our AR app up and running, we’re going to be using Unity for this. Unity has some great native cross platform support which we can leverage to create our application. But before we even open Unity up, you might want to check your phone. And by that I don’t mean Instagram (unless its @mavricresearch), I mean check if your phone has AR support on it. AR despite being around for a long time now, is still limited on some older smart phones, thankfully there’s a list that can answer that for you: https://developers.google.com/ar/discover/supported-devices
All good? Okay, lets jump into unity, I’m using version 2020.1.17f1 but any of the 2020’s will do. Create a new project through Unity Hub, making sure android build support is enabled if you’re building to android, guide on how to include that here.
Go to Window/Package Manager and install the following packages:
- AR Foundation – Unity’s Cross Platform AR Package
- ARCore XR Plugin – To enable Google’s ARCore integration (use this for your Android users)
- ARKit XR Plugin – To enable Apple’s ARKit integration (use this for your Apple users)

For this demo I will be building to Android as building to iOS (and using the ARKit plugin) requires XCode to do so. XCode is a developer environment which converts ‘Unity Code’ into ‘Apple Code’ and is only available on macs or a virtual machine. So if you’re without a Mac and you’ve got an iPhone, sorry but this is as far as we go! If you do have a mac, there are a number of tutorials out there on using XCode to build to your phone/tablet, I’d go into more detail here but its almost the subject of another blog, for now check out the unity documentation to see where you stand: https://docs.unity3d.com/Manual/StructureOfXcodeProject.html
Now go to Edit/Project Settings and select Player:
- For android:
- Change the minimum API settings to 7.0
- Remove Vulkan from the Graphics APIs, this is currently not supported at the moment
- Turn of Multithreaded Rendering
- For iOS:
- Change the architecture to ARM64
- Make sure the target minimum API is set to 11
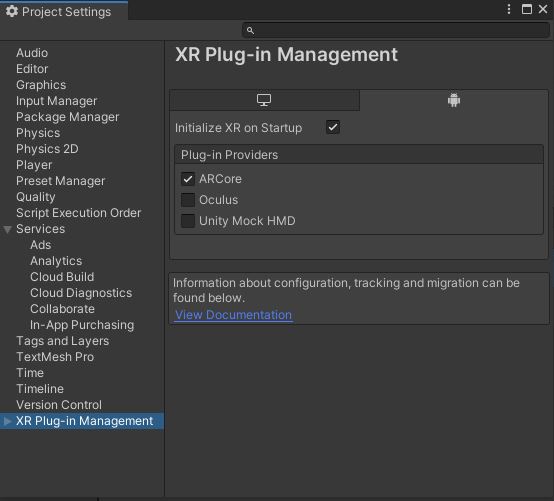
Now back under project settings, go to XR Plug-in Management. If this didn’t install with AR Foundation, this can be added separately under Window/Package Manager. For our android build, I will tick ARCore supported, but for an iOS build, this would use the ARKit.
Scene Set Up
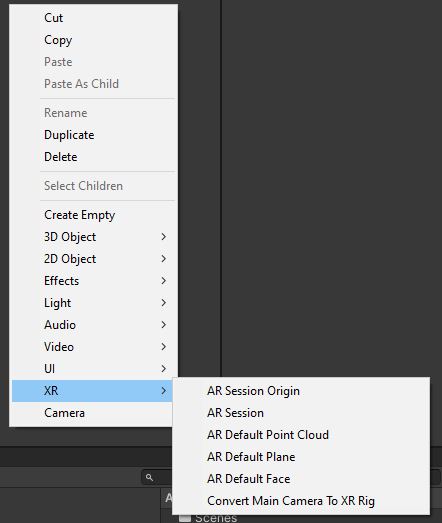
Okay, that was a lot of effort but its all worth it for the simplicity of what’s to follow. In hierarchy, right click and hover over XR, you should see a list of AR Components. We need to add the following items:
- AR Session – controls the lifecycle of an AR experience by enabling or disabling AR on the target platform.
- AR Session Origin – transforms trackable features, such as planar surfaces and feature points, into their final position, orientation, and scale in the Unity Scene.
- AR Default Point Cloud – Renders the dots that are picked up by the session origin
- AR Default Plane – Renders the planes created by the dotS
Because the AR Session Origin has a camera, we can delete the main camera. Once these are imported, click on the AR Session Origin game object. It’s a bit empty at the moment so we need to add a few things by clicking on add component in the inspector tab, we’ll need to add:
- AR Plane Manager
- AR Point Cloud Manager
- AR Raycast Manager
Once added, drag and drop the ‘AR Default Point Cloud’ game object to the ‘AR Point Cloud Manager’ and the ‘AR Default Plane’ game object to the ‘AR Plane Manager’. Image below for Clarity:


Placing the object in the scene
Okay, that’s everything set up for a basic AR app, now we just need to add a script to allow us to place what we want into the AR space. Thankfully, the guys at unity have created a script for us to do that which I’ve shared below:
using System.Collections.Generic;
using UnityEngine;
using UnityEngine.XR.ARFoundation;
using UnityEngine.XR.ARSubsystems;

namespace UnityEngine.XR.ARFoundation.Samples
{
    /// <summary>
    /// Listens for touch events and performs an AR raycast from the screen touch point.
    /// AR raycasts will only hit detected trackables like feature points and planes.
    ///
    /// If a raycast hits a trackable, the <see cref="placedPrefab"/> is instantiated
    /// and moved to the hit position.
    /// </summary>
    [RequireComponent(typeof(ARRaycastManager))]
    public class PlaceOnPlane : MonoBehaviour
    {
        [SerializeField]
        [Tooltip("Instantiates this prefab on a plane at the touch location.")]
        GameObject m_PlacedPrefab;

        /// <summary>
        /// The prefab to instantiate on touch.
        /// </summary>
        public GameObject placedPrefab
        {
            get { return m_PlacedPrefab; }
            set { m_PlacedPrefab = value; }
        }

        /// <summary>
        /// The object instantiated as a result of a successful raycast intersection with a plane.
        /// </summary>
        public GameObject spawnedObject { get; private set; }

        void Awake()
        {
            m_RaycastManager = GetComponent<ARRaycastManager>();
        }

        bool TryGetTouchPosition(out Vector2 touchPosition)
        {
            if (Input.touchCount > 0)
            {
                touchPosition = Input.GetTouch(0).position;
                return true;
            }

            touchPosition = default;
            return false;
        }

        void Update()
        {
            if (!TryGetTouchPosition(out Vector2 touchPosition))
                return;

            if (m_RaycastManager.Raycast(touchPosition, s_Hits, TrackableType.PlaneWithinPolygon))
            {
                // Raycast hits are sorted by distance, so the first one
                // will be the closest hit.
                var hitPose = s_Hits[0].pose;

                if (spawnedObject == null)
                {
                    spawnedObject = Instantiate(m_PlacedPrefab, hitPose.position, hitPose.rotation);
                }
                else
                {
                    spawnedObject.transform.position = hitPose.position;
                }
            }
        }

        static List<ARRaycastHit> s_Hits = new List<ARRaycastHit>();

        ARRaycastManager m_RaycastManager;
    }
}
This script might look complicated but its actually not that hard when its broken down. It works a bit like this:
- Asks for us to provide the object we want to place.
- Looks for an input, i.e. us touching the screen
- Using that input point, it casts a ray from the screen to the plane we’ve picked up (like shooting a gun)
- Tells the object we’ve provided to spawn where we’ve ‘hit’ the plane.
Using the script above, create a new C# script in the assets folder, copy and paste this script, and drag and drop the C# script onto the AR Session Origin. Finally we need to add an object to spawn to this script. I’ll leave this up to you! If you have something you want to try and spawn, be my guest. If you’d rather just test it first, we can use unity’s default cube.
To do this, right click in Hierarchy and add a cube, scale this down to 0.1 on each axis. Then shift this up on the Y axis by 0.05 to level with the ground. Drag and drop this cube into the Assets folder to make this into a prefab. Delete the object from the hierarchy and drag and drop the newly created prefab into our script.
Test Time
Now we should be ready to go! Connect your phone/tablet to your computer, select your device under run device and then click build and run. Save the build somewhere (mac users, its XCode time), and then the app should begin playing on your phone. You should see something like this:
Conclusion
“What about your pergola!” I hear you shouting at the screen, well since you asked, I swapped out the Pergola with the default cube and this was the result.
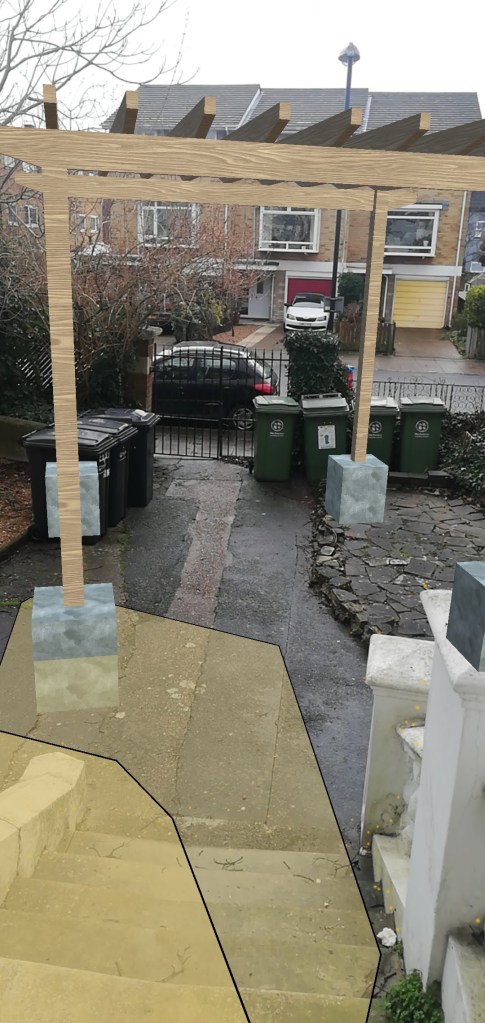
So yeah, not quite 100% convincing enough to take to my dad’s garden yet, but i’m leaving it open ended for a reason… what I’d like to do in future posts is look at ways of optimising this, to include light samples, point cloud and planes hiders, rotation and scaling adjusters and maybe some form of interaction with the object itself.
Either way, I hope this tutorial helps you get started with your own app – more to come! And of course, if there’s something specific you’d like to see for this, let us know!

2 thoughts on “What you need to know about getting started with Augmented Reality in Unity”