I was very excited to see the release of Unity AR Companion app this week. Object scanning, placement, and integration with unity projects all achievable in one app… at a cost. I was disheartened to see that it requires a Unity MARS license (which to their credit has a free trial period for 45 days) at the cost of $600 per year. Don’t get me wrong I think that’s a reasonable price for the technology, but if you’ve got some time on your hands you may be able to get the same result for much less!
Before you start you’ll need a few things:
- A decent camera; mobile or digital
- A decent graphics card (I.e. VR Ready Spec)
- As well as Meshroom (instructions on installation later) you’ll also need Unity and Blender
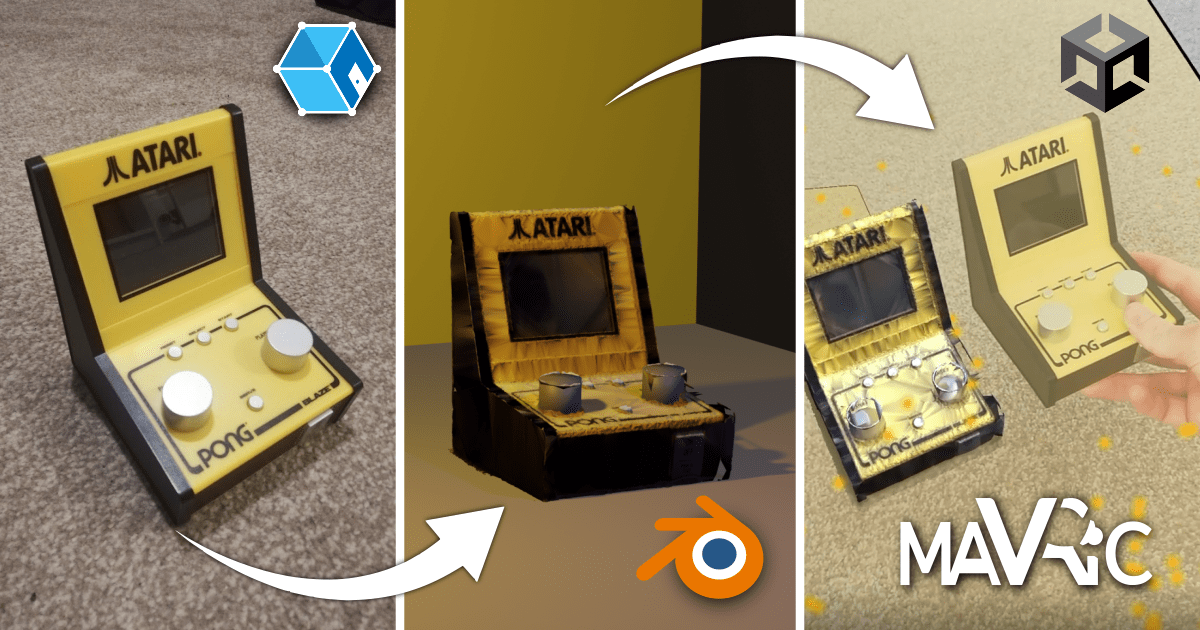
- Something to capture (I’m using a mini-Atari, thank you secret Santa!)
What is Photogrammetry?
Before we begin capturing elements, we need to understand some principles of photogrammetry. Simon has already talked about some of these principles, combined with LiDAR in his previous blog.
Photogrammetry is the use of photography in surveying and mapping to ascertain measurements between objects.
Put simply, this involves making 3D models from a series of photographs. In order to do this, the pictures need to be able to align by finding similar points within the images to then draw geometry against.
Capture
Capturing Reality have a great article on what to consider when taking pictures for photogrammetry, summarised below:
- Do not limit the number of images
- Use the highest resolution possible.
- Each point in the scene surface should be clearly visible in at least two high quality images.
- Always move when taking photos. Standing at one point produces just a panorama and it does not contribute to a 3D model creation. But move around the object in a circular way.
- Do not change viewpoint more than 30 degrees.
- Start with taking pictures of the whole object, move around it and then focus on details. Beware of jumping too close at once, make it gradual.
- Complete loops. For objects like statues, buildings and other you should always move around and end up in the place where you started.
You have two options for capturing your object. Filming and extracting frames, or just taking photos. Taking photos certainly takes longer to do, but if you have a lower quality camera or a shaky hand, this method can provide much clearer results. Otherwise, here’s the steps to extract frames from a video.
(Note, I wanted to credit a video tutorial on YouTube here, but Its either been deleted or I can no longer find it. Either way, if you’re the European guy that did the Meshroom photogrammetry of his own face, thank you!)
- Take a film of your object using the guidance above, save.
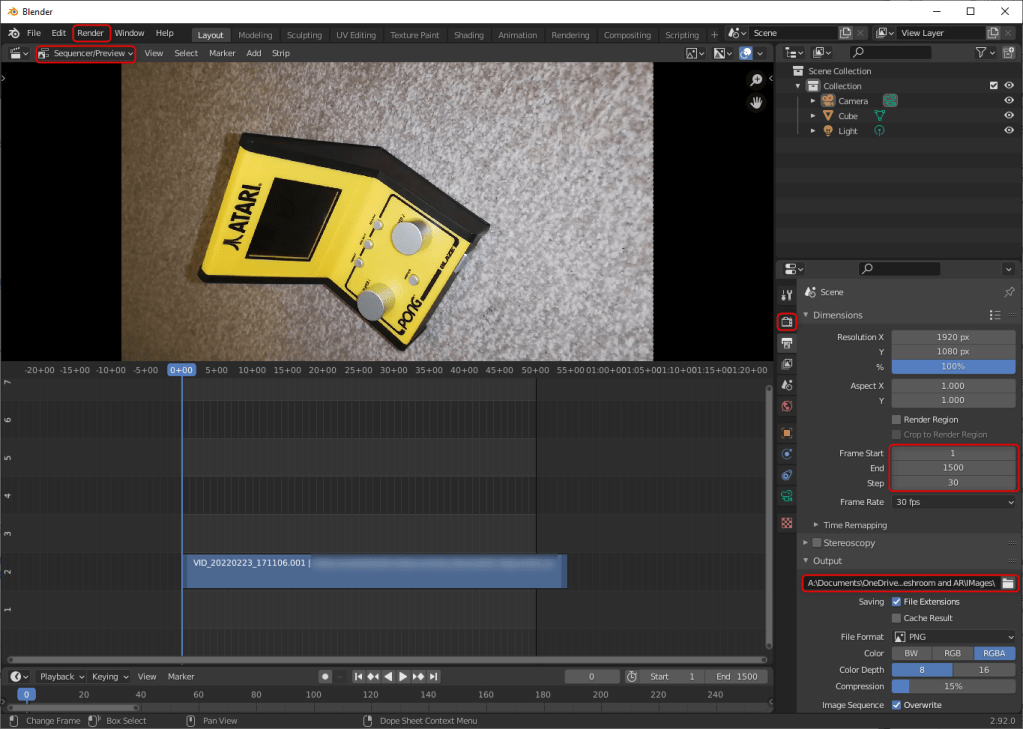
- Open up blender, create a new blank screen
- Open up the video sequencer
- Change view to sequencer/preview
- Drag and drop your video in
- Delete the audio
- Adjust the start and end frames for your video in the Output Properties tab
- IMPORTANT: Specify how many steps you would like, if you’re video has 1500 frames and the step is 1, you will get 1500 images, which I guess is great in an accuracy sense of things but also if you have a life you may want to aim for say 30+ frames.
- Under Render Properties/Colour Management, adjust the colours to look the most true to life as possible, remember, these images will soon become the texture of the object.
- Choose a folder to export these images to.
- When ready, click render, then render animation.
All going well, you should have a series of exported images! For me, my phone camera is very old and for this demonstration I took 30 separate photos.
Generating the Photogrammetry Model
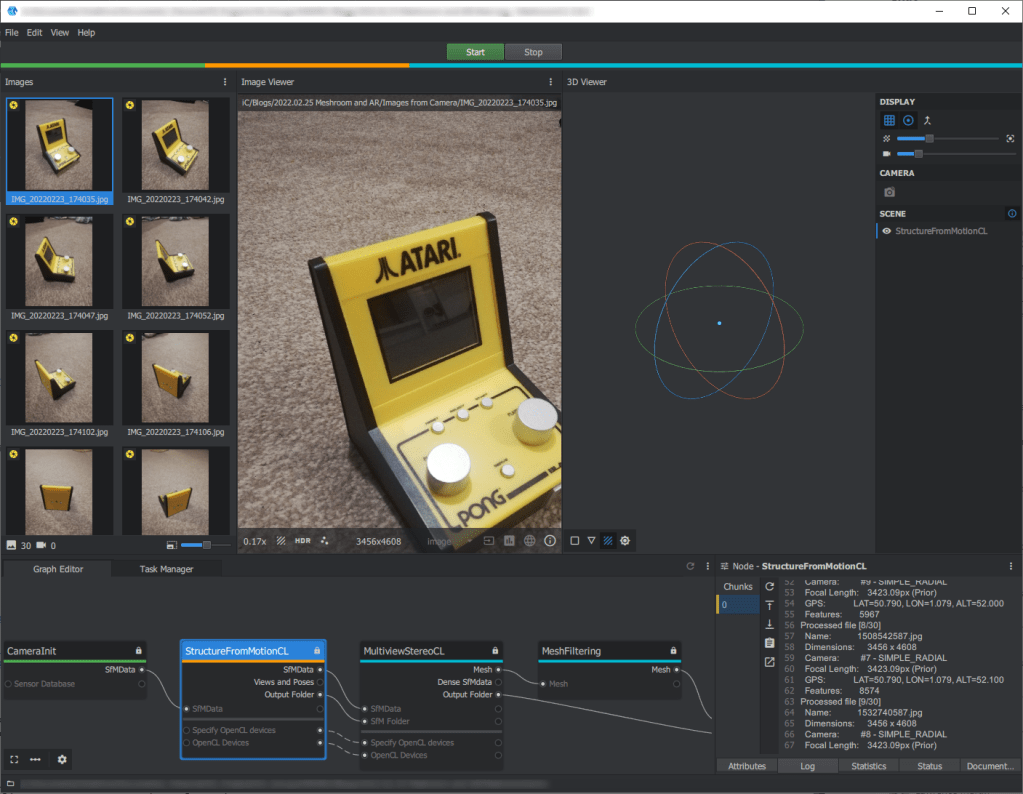
Now for some photogrammetry! In order to do this we need to download Meshroom. I was disappointed to download the normal Meshroom only to be told by the software it doesn’t work because I don’t have an NVIDIA graphics card! But thanks to the amazing developer community, someone has set up a version of Meshroom that works with AMD cards too.
IMPORTANT: if you have antivirus software enabled, make sure you allow the Meshroom app in settings, else it won’t allow the software to do its thing and important things like text files telling the software where the point of the mesh are wont get stored.
Once downloaded, run the .exe file within the folder and Meshroom should open. When open, drag and drop all of the images into the software. Then click the green start button at the top. And… that’s quite honestly it! Just sit back at let it do its thing – though you may be waiting a while. To see the software’s progress, you can click on the log tab in the bottom right. Although I am using an MeshroomCL, the principles are the same for regular Meshroom.
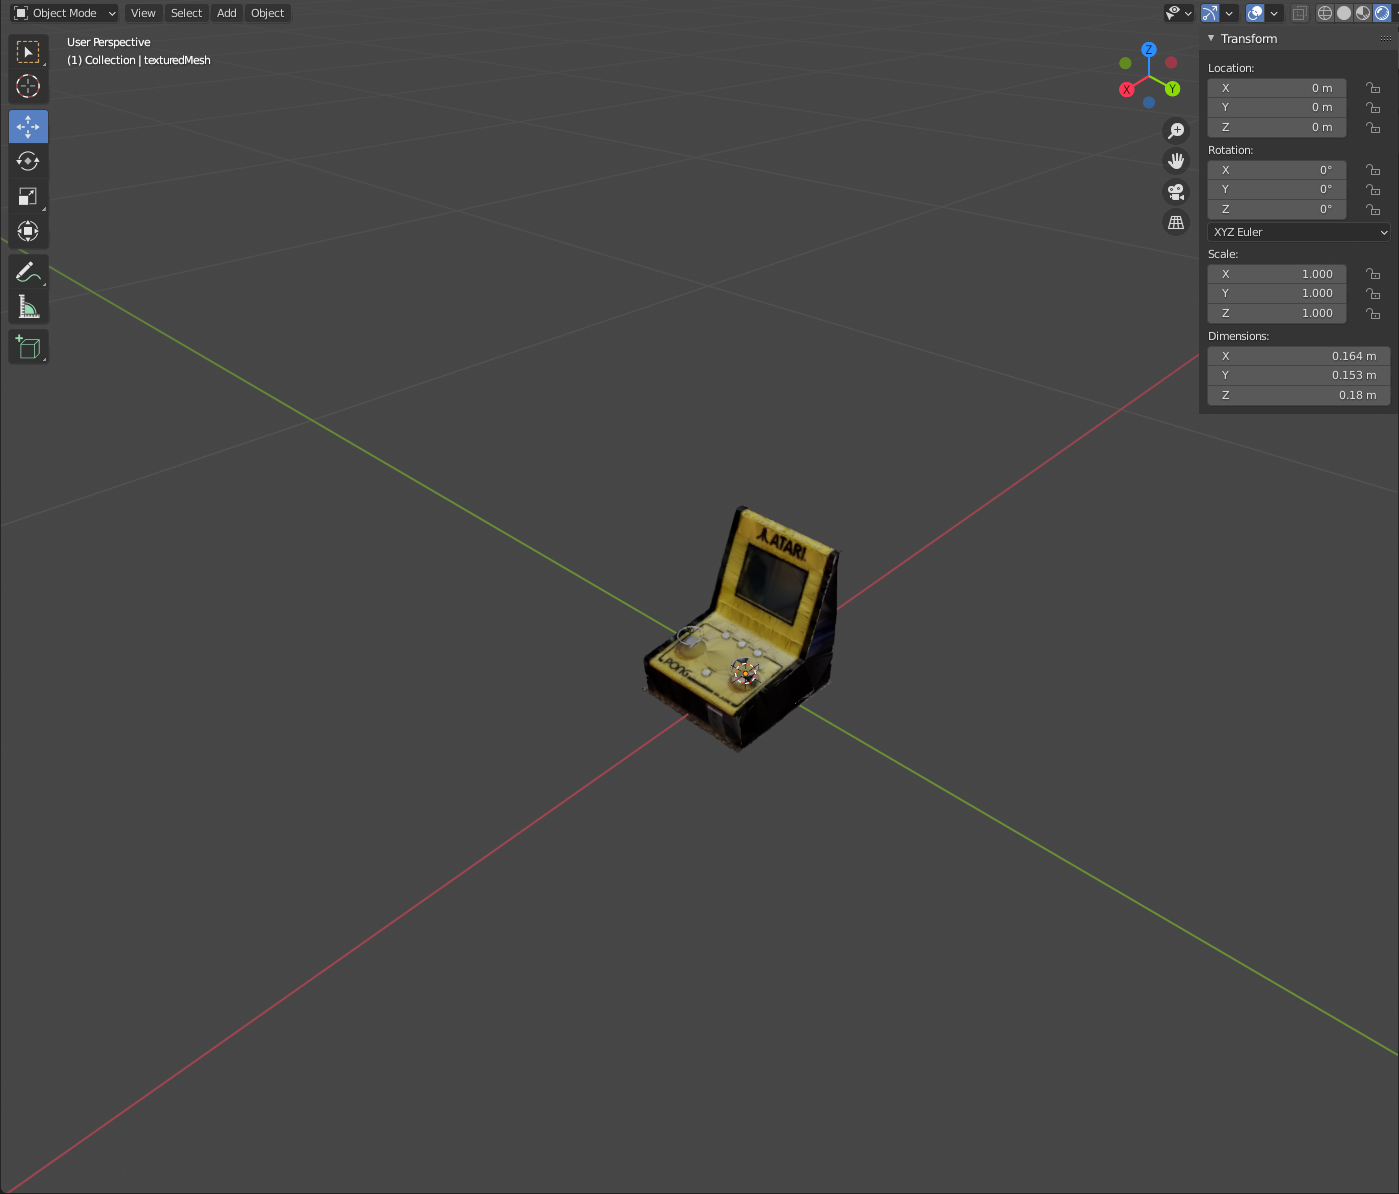
Once run, you should have a nice textured mesh in the Texturing folder of the Meshroom cache. Locate the texturedMesh.obj file and save this somewhere you can access it. You might be happy with the result as it is, however it is very likely that this will come in at all angles and have picked up more than is needed, so we need to do some neatening. Time to open blender again.
Editing the Photogrammetry Model
Open up a blank scene in blender and import your textured mesh. By navigating to the rendered view, you can see the mesh with all the textures on. Now this bit is going to vary from capture to capture and how you edit it is very much up to you. I think the best way to explain this bit is discuss what I have done to my model so that you can apply some similar principles.
Rotate into position: As you can see from the image below, my model came in at a very odd angle. To fix this, I simply selected and rotated using the rotate tool to get into a position I was happy with.
Delete the irrelevant points: Once in edit view, I turned on the Xray toggle (top right of screen under options) and just went round and highlighted and deleted vertices until I was happy with the result. This doesn’t affect the texture in any way (other than not rendering on the points you’ve deleted) and helps reduce the file size significantly, which is important for AR!
Moved the Origin: The origin (little orange dot) was floating in mid air when this was done, if we are importing to Unity, this will be its basepoint at 0,0,0. Therefore we need to move it to something that makes more sense. For me this was the middle of the base of the Atari. To do this, I moved the 3D cursor using the 3D cursor tool, then when in the right position, I selected Object/Set Origin/Origin to 3D cursor.

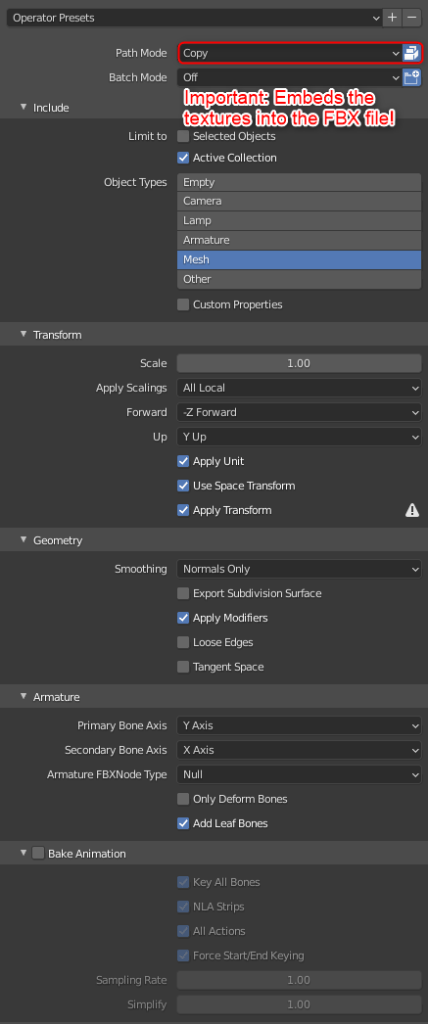
Once everything is cut back and ready, it’s time to export to Unity. For this we are going to export to FBX with the following settings:
The Augmented Reality Scene
Lastly, we’re going to jump into Unity to get this working in AR. If you’ve been following our blogs, you’ll know that we’ve already explained how to get a basic AR scene working before. However, if you’d like to start a fresh, you may be interested to know that Unity have released VR and AR templates. This is really a subject for another blog but for now, however unity offer some tutorials and guidance on how get started with these templates.
Whether you’re using the scene we’ve made before or creating a new one, you’ll still need to import the object ready for use. This is as easy as dragging and dropping the exported FBX into the assets folder. Once in the folder, be sure to extract the materials. Then set this up within your scene (if you’re using the one we have created, its just a case of swapping the pergola prefab out with the model, similar to what we did in the follow up blog).
You should start to see something like this!
Conclusion
Now it’s not perfect… and tools such as LiDAR make this much more detailed and truer to life, but it’s a pretty good representation of real life for very little cost. I was also impressed with how Unity handled the dense mesh and multiple textures, albeit, many of these might not be feasible in AR.
It’s also important to note that even if it doesn’t look great, it can give you a really good basepoint to model from. You see a lot of blender tutorials out there that have a plan, elevation, section and reference images that act as a backdrop for your modelling. What better than a 3D backdrop – no second guessing the reference image!
In terms of its use in the AEC industry, tools like this can help us capture complex arrangements on site where junctions and details have been formed. These captures can be brought back to the office and interrogated in a way far more immersive than before. In the same sense, it doesn’t necessarily need to be in AR – you have a 3D model you can do whatever you want with, so tools like VR and internet based 3D viewers are not out of the question.
