
Following on from our previous blog discussing variant sets in Unreal using the variant manager, this time round we’re going to look at how to get the functionality executing in runtime.
As discussed previously, the management of variants allows the user to enable/disable components and variables inside the game engine. This is useful if you are working inside the editor itself as it allows you to switch between aspects of the project, much like the ‘Design Options’ feature for those familiar with Autodesk Revit. However, what if we want to include these options as an interactive element of our program (i.e. executing within the runtime environment of our application), be that on typical display or in VR?
Well, that would certainly be more exciting than a paper print-out, brochure, storyboard, PowerPoint presentation or other traditional medium or form of communication to convey ideas and possibilities wouldn’t it? Let’s continue…
World of Widgets
We have our variants set up, now we require a means of accessing and enabling these variants from within the program. First off we’re going to need some kind of visual cue to make it obvious to the user that these variants exist, so let’s create a user interface (UI). To do this then, we create a ‘Widget’ by adding a Widget Blueprint via the content browser. A widget is a component of the engine which allow the generation of UI elements.
Upon opening the new blueprint, add a button via the palette window to act as a visual representation of the variant we are going to enable. This could be a plain button with some text overlay or better yet, select the button and assign an image via the ‘appearance’ tab. You can take this further an apply alternate images to trigger based on the button’s state (i.e hovered, pressed).
Rinse and repeat for every variant you’re going to enable. One issue you may face is having too many variants to fit on-screen, for this you may want to organise with a folder/nesting system so that you can hide or show the items you want and keep the display uncluttered. There are several ways of achieving this, which we won’t go into here, but this can be a simple as having multiple widgets called upon by another blueprint.

Event Graph
Now we have a visual representation for our UI element, we’ll want to assign the variants to our fancy new buttons (enabling the variants via the widget blueprint). Head to the ‘Event Graph’ of the widget blueprint.
Firstly from our ‘Event Construct’ which is initiating our widget, we’re going to add a ‘Get All Actors of Class’ and set the Actor Class as ‘Level Variant Set’. This is referencing our level variant set we created in our previous post.
Now we want to expand out this function with a ‘Get (a copy)’ array (this is retrieving a copy of the component referenced, thus not changing the component itself). Expand out the array and set ‘Promote to Variable’, here we are also subsequently generating a new variable. Connect the ‘Get All Actors..’ function execute to the new variable execute. Now we have successfully referenced our level variant set within blueprints and next we need to be able to physically interact with the variants by enabling them.

From the new variable add a ‘Switch on Variant by Name’ function. Then, reference the name of the Variant Set and its associated Variant. Finally, under the ‘Variables’ menu window, select the associated button you have have created inside the designer window when we created the UI elements. Under the ‘Details’ window and ‘Events’ we are going to choose how we enable this switch on function by defining how we interact with it. We’re going to select ‘On Clicked’. As you may have guessed, the new ‘On Clicked’ event that is created will execute a function when a “click” is detected. So, connect this to the function execute. The ‘On Clicked’ does not necessarily refer to a mouse click, this can be mapped to any input you designate such as a VR motion controller trigger.

That’s it for the event graph. You’re going to want to repeat these steps for each variant you have. As a shortcut, just copy the function and on-clicked events and change the name of the Variant Set and Variant to suit. Compile and exit..
Widget-enabling Blueprint
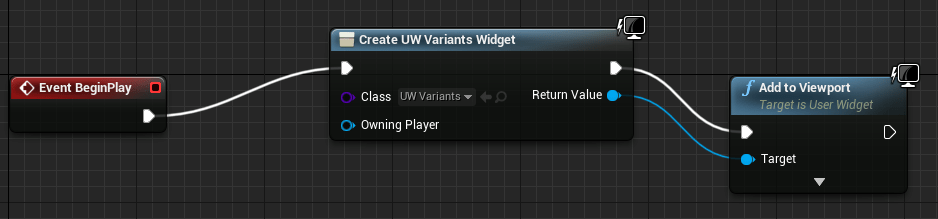
We now need something to call our widget blueprint itself into the runtime environment. To do this, create an Actor Blueprint. On the ‘Event BeginPlay’ (when the program runs) execute a ‘Create Widget’ and under ‘Class’ reference the widget blueprint we’ve recently created. Finally, execute from here an ‘Add to Viewport’ function to display the widget in runtime. Compile, exit and drop the actor inside the level scene. Hit play and you’re good to go. *Note: If you have your scene set up for keyboard navigation, hit Shift+F1 to switch to mouse cursor. Otherwise you may want to disable keyboard input.
Concluding Comments
Now we have the ability to enable the variant sets in runtime by selecting the UI elements we’ve generated. Next time we’ll be looking at how this works with VR input and some modifications to widgets for a better experience “in headset”.
