
Are you confused by the new input system for Unity’s XR Interaction Toolkit? I was too when I first saw it, especially as I’d mainly been using Unity for solely VR and AR purposes. However, you shouldn’t be! It’s actually a lot simpler than it looks and you should definitely be using it because it opens up your VR games to much more complex and interesting interactions.
In this post, I’m going to try my best to explain how this new input system works for Unity’s XR Interaction Toolkit and how you can leverage it to set up a basic VR Scene with grab and teleport interactions. First, we need to set up a project…
Setting up a VR project:
- Open Unity Hub, click create new project (I’m using 2020.1.0f1), then click 3D.
- In the toolbar, go to Window/Package Manager
- Click on the packages dropdown and select Unity Registry
- Click on the settings cog and click advanced project settings
- Tick enable preview packages
- Import the following:
- XR Interaction toolkit – 1.0.0-pre.1 (If prompted to restart do so!)
- XR Interaction toolkit – Default Input Actions Sample
- XR Plugins Manager – 3.2.16

- Close package manager
- In the toolbar, go to Edit/Project Settings/XR Plug-in Management
- Tick the system you’re using, for me I’m using Oculus.
Note: If you’re using a valve index, Valve have created an OpenVR plugin for unity which you can import from GIT URL (I haven’t tried it but it looks like the same principles!)
What’s the difference between device based and action based?
Before we go any further, I should explain the difference between the new and legacy input systems (at least my understanding of it!)…
The best way to describe this is with an example, we’re just about to set up our right hand with a ‘direct grab interactor’ which allows us to pick up ‘grab interactable’ objects. Using the ‘device-based’ system, all I would need to do is change the select usage to ‘grip’ in the ‘XR Controller’ Script attached to my right hand game object.
Now say that I also wanted to be able to grab objects with the ‘primary button’ as well as the ‘grip’. We can’t do this as easy because we’re limited to a selection of things, we’d need to create a duplicate game object that uses the other button or write some code as a workaround.
The new action-based system solves this problem, and those that have been using unity for WASD gaming may be familiar with this system. The action-based system uses the new Unity input system, which acts as a ‘virtual remote’ for our controller and allows us to associate multiple key bindings to one ‘action’.


Now you know how the input system works, lets set it up! I’ve written it down but if you’re more visual (like I am) there’s a video below going through the stages.
Setting up the VR Scene:
- To make an XR rig: Right click in hierarchy, XR, room scale action-based rig
- To make a ground plane: Right click in hierarchy, 3D Object, Plane, scale up by 5 on each axis.
- To make a table: Right click in hierarchy, 3D Object, Cube, scale down the cube to 0.8 on each axis, position in front of the XR Rig.
- To make an interactable object: Right click in hierarchy, 3D Object, Cube. Scale the cube down to 0.2 on each axis, position on top of the table, add an XR Grab interactable script to the object.
- To set up the hand input system: In the asset folder, browse to the imported ‘Samples’ folder, drag and drop the ‘XRI Default Left Controller Actions’ to the Left Hand Controller Game Object under the XR Rig and the same with the Right Hand actions and game object.
- To set up the hands: On the right hand, remove the XR Interactor Line Visual, Line Renderer and XR Ray Interactor and add a XR Direct Interactor Script and a Sphere Collider. Scale the Sphere collider down to 0.2 on each axis and set as a trigger. Leave the left hand as is.
- To make a controller placeholder: In the hierarchy create a sphere and scale this down to 0.1, remove the sphere collider and drag this into the assets folder to make a prefab, remove the prefab from the hierarchy, under the controllers, drag and drop the prefab we just made as a child game object of both the left and right hand.
Now if we hit play… nothing happens! This is because we need to enable the inputs before they can be used, thankfully the guys at Unity have also solved this for us and has created a script which we can use to do this, I’ve put a copy below for you to copy into your scene.
using System;
using System.Collections.Generic;
using UnityEngine.InputSystem;

namespace UnityEngine.XR.Interaction.Toolkit.Inputs
{
    /// <summary>
    /// Use this class to automatically enable or disable all the inputs of type <see cref="InputAction"/>
    /// in a list of assets of type <see cref="InputActionAsset"/>.
    /// </summary>
    /// <remarks>
    /// Actions are initially disabled, meaning they do not listen/react to input yet. This class
    /// is used to mass enable actions so that they actively listen for input and run callbacks.
    /// </remarks>
    /// <seealso cref="InputAction"/>
    public class XRInputManager : MonoBehaviour
    {
        [SerializeField]
        [Tooltip("Input action assets to affect when inputs are enabled or disabled.")]
        List<InputActionAsset> m_ActionAssets;
        /// <summary>
        /// Input action assets to affect when inputs are enabled or disabled.
        /// </summary>
        public List<InputActionAsset> actionAssets
        {
            get => m_ActionAssets;
            set => m_ActionAssets = value ?? throw new ArgumentNullException(nameof(value));
        }

        protected void OnEnable()
        {
            EnableInput();
        }

        protected void OnDisable()
        {
            DisableInput();
        }

        /// <summary>
        /// Enable all actions referenced by this component.
        /// </summary>
        /// <remarks>
        /// This function will automatically be called when this <see cref="InputActionManager"/> component is enabled.
        /// However, this method can be called to enable input manually, such as after disabling it with <see cref="DisableInput"/>.
        /// <br />
        /// Note that enabling inputs will only enable the action maps contained within the referenced
        /// action map assets (see <see cref="actionAssets"/>).
        /// </remarks>
        /// <seealso cref="DisableInput"/>
        public void EnableInput()
        {
            if (m_ActionAssets == null)
                return;

            foreach (var actionAsset in m_ActionAssets)
            {
                if (actionAsset != null)
                {
                    actionAsset.Enable();
                }
            }
        }

        /// <summary>
        /// Disable all actions referenced by this component.
        /// </summary>
        /// <remarks>
        /// This function will automatically be called when this <see cref="InputActionManager"/> component is disabled.
        /// However, this method can be called to disable input manually, such as after enabling it with <see cref="EnableInput"/>.
        /// <br />
        /// Note that disabling inputs will only disable the action maps contained within the referenced
        /// action map assets (see <see cref="actionAssets"/>).
        /// </remarks>
        /// <seealso cref="EnableInput"/>
        public void DisableInput()
        {
            if (m_ActionAssets == null)
                return;

            foreach (var actionAsset in m_ActionAssets)
            {
                if (actionAsset != null)
                {
                    actionAsset.Disable();
                }
            }
        }
    }
}
Add this script to a new empty game object, change the actions list to 1 and then drag and drop the ‘XRI Default Input Actions’ from the ‘Sample’ folder into this script. You should have something that looks a bit like this (minus the colours I added):
Now, lets say that the ray we have on our left hand we want to use as a teleport ray and not a distance grab ray…
Setting up teleportation:
- To make the ground ‘teleportable’ to: Add a teleportation area script to the ground plane we made earlier by going to add component/XR/Teleportation Area.
- To allow teleportation to happen: Right click in hierarchy, XR, Locomotion System, drag and drop the XR Rig into the Locomotion System script.
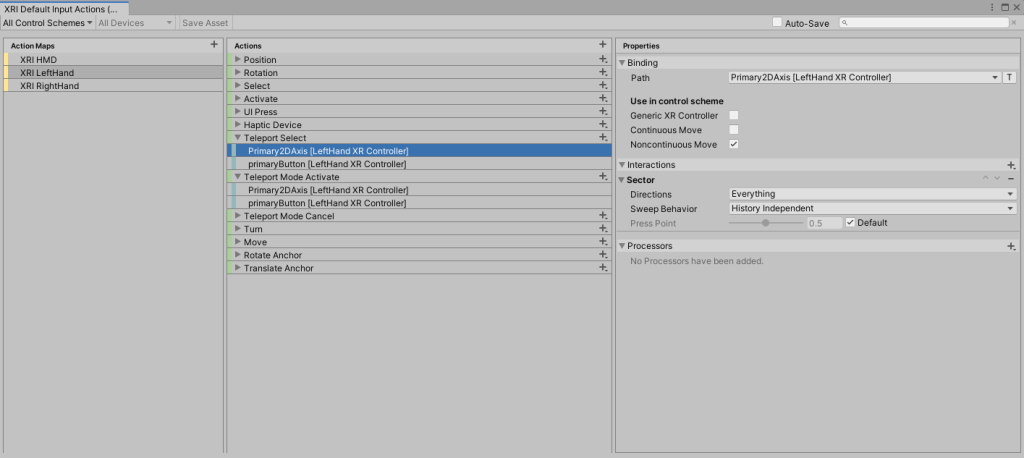
- To tell the hands what button to use: Go to the Default input actions sample folder, expand the ‘XRI Default Input Actions’ drop down, drag and drop the ‘Teleport Mode Select’ into the ‘Select Action’ on your left hand controller, and then the same for ‘Teleport Mode Activate’ under ‘Activate Action’.
- To change the line from straight to a curve: Under the ‘LeftHand Controller’ game object, go to the ‘XR Ray Interactor script’ and under ‘Raycast Configuration’ change the line type from straight to projectile curve.
Video below for you visual learners:
Now hit play, and you should be able to teleport around the scene by pushing up the left analogue stick. (You might also be able to pick up the interactable object with it too, if you want to stop doing this, add this to its own layer and tell the ray to ignore objects on that layer)
Notice how by swapping out the Input Action, we have changed what buttons can be used to activate the components of the game object. By double clicking on these actions, this opens up an input manager where you can experiment and swap out different key bindings to create your ideal setup!
This is just a basic example but hopefully this helps provide some clarity on the new input system! If you need to know more I’d recommend checking out the documentation for XR Toolkit and Input System
If you’ve been using this, how are you finding using it? Could we have done things differently? We’d love to know!

Dude. Thank you!!
3 year developer (newish to unity) and it was taking me 4 days to figure out this basic stuff. Your stuff was easy enough to follow. (I did need to remove the preset ActionController from the XR Origin > Controllers, before adding in the one from the samples.). Other than that, it was awesome dude! thanks again.
Thank you! Glad it was of help
Awesome Tutorial. Thank you for your help.